Do-it-yourself scanning: how we got into OCR and you can too

Nick Barreto works where books and technology intersect. He’s managed and built apps, is as an expert on ebook formats, metadata and workflows. He is committed to automating all the repetitive tasks to free up more time for the work that matters. Nick is one of Canelo’s co-founders and the Technology Director. @nickbarreto
This article is inspired from a thread written by Nick Barreto for the #eprdctn community on Twitter. It has been reproduced here for Bookmachine in a less ephemeral form.
This whole adventure began because when we started out at Canelo: we knew we were going to be publishing books that had no digital editions or any digital files at all, so scanning and OCR was going to have to happen at some point. And because we wanted to get a little ‘closer to the metal’, and as a way to cut costs (we were a brand-new startup!), we started looking into whether we could do this ourselves.
Commercial book scanners can be prohibitively expensive, with modern setups potentially running into the hundreds of thousands, so we knew this wouldn’t necessarily be the right avenue for us. But we did a lot of investigation, and what we discovered was a wonderful community, not unlike the #eprdctn community, of people doing DIY book scanning. You can check it all out, they’re generally at https://forum.diybookscanner.org/.
This incredible community were putting together kits that you could assemble yourself for only a few hundred dollars. We decided to pick one up and have a go, in the spirit of #eprdctn. With the savings from the cost of postage and scanning itself, our kit paid for itself pretty quickly! There are more models nowadays, and they’re available here. The kit we ordered included everything necessary – the scanner assembly itself, as well as the cameras, cables and controller units to run it all. In addition to the physical kit, we’re also making use of some fantastic open-source software that facilitates and helps the process.
When it finally arrived, this is what we got when we opened up our box:

It took some tinkering and assembly, but this kit did contain everything we needed. If you’ve ever built any Lego or Ikea furniture, you got this! As it was called an ‘Archivist’ scanner, we nicknamed ours Archie. Here’s a photo of when it was first completed:

The way it works is you have two cameras with custom firmware controlled by a Raspberry Pi that creates a web interface. So you use your computer to connect to that web interface, and use it to tell the cameras to fire both at once and take a picture of both pages at the same time.

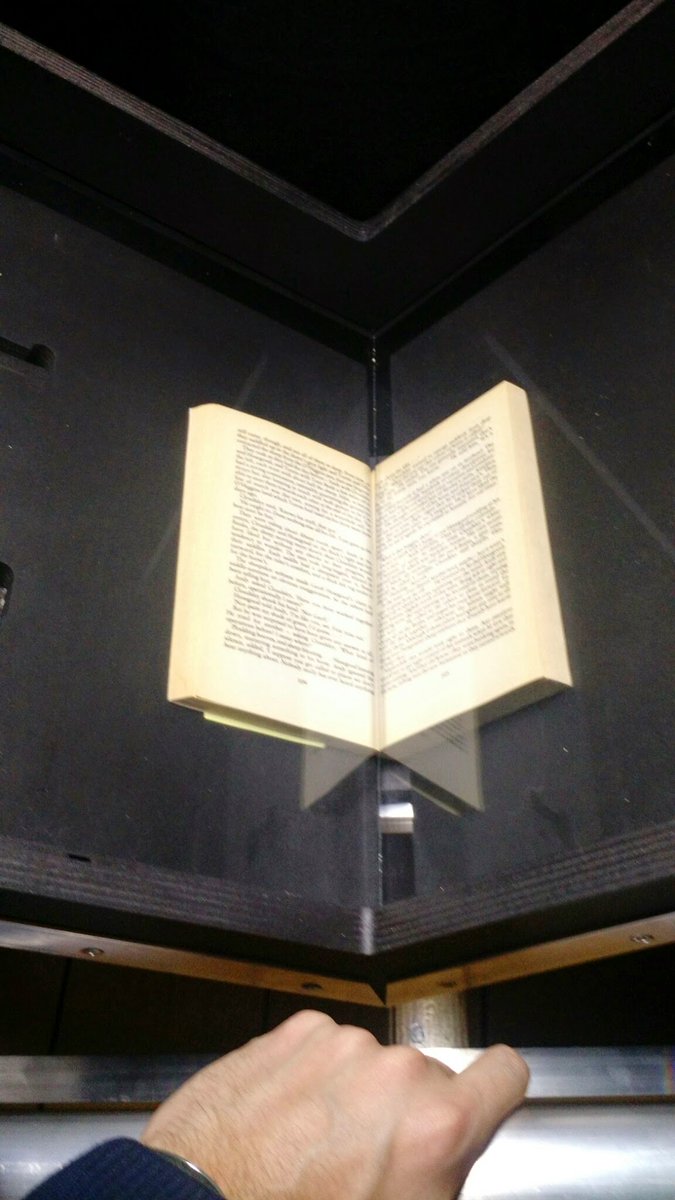
When you push down on the handle it raises the cradle the book is on so it is pushed flat against the glass for the image capture to be as clean as possible. You can see that in the next image:
This isn’t that advanced a setup. You still need to turn the pages yourself and trigger the capture. But the scanner software running on the Raspberry Pi is a little gamified, it tells you how many pages per hour you are doing! That software is open source, and it’s called Spreads.
All this is a great way to capture the images, but what you end up with is a bunch of photos of pages. You still need to perform Optical Character Recognition (OCR)! This will ‘read’ the words on the page and create a digital document out of your physical, printed page. But how do we do that? First, you need to do a little post-processing. The images you’ve captured probably still have lots of stuff to the sides that isn’t your book, for example:

There’s another great open source package to help with that post-processing called Scantailor. Scantailor lets you crop, cleanup, de-warp and do loads of other helpful things to your images in a single batch that means you can maximise the efficiency of your OCR. Installing it can be tricky, and instructions to do that are probably outside the scope of this article, but once you have it installed you need to launch it from the command line, and you do that by typing in “scantailor” into your terminal. However, after you’ve launched it, it is quite clear and easy to use.
If you use Homebrew on a Mac, you can install Scantailor that way but at the moment it requires a little more legwork. The steps described in this GitHub page do work though and I have used them recently.
Once you’ve post-processed your images with Scantailor, it’s time for the actual Optical Character Recognition work. There are commercial solutions for this and they can be really expensive, but once again there are great open source packages too. The one we use is called – for the Marvel fans out there – Tesseract. Tesseract is super cool and can be really accurate if it has been trained in the specific fonts you are scanning. But even out of the box it is more than good enough to use, we’ve found.
Lots of amazing people have worked on Tesseract, and you can find a little of its history on the project page in Github. Using it does also involve the command-line. Installing it is easier than Scantailor however: you can just trust Homebrew to handle it all this time.
If you’re using Scantailor, your post-processing will have resulted in a folder with a .tif image for each page, numbered sequentially. So when you navigate to that folder in your terminal, you’re ready to run Tesseract.
We want to run our OCR on all the images in the folder, and with the command line, provided you’re already working in the correct folder, the entry will look something like this:
$ for i in *tif; do b=`basename “$i” .tif`; tesseract “$i” “$b” -l eng; done
This for loop will create a .txt file for each one of those images. To put them all into a single document, I usually run this other command, which puts the contents of all those .txt files into a single file with a markdown extension:
$ cat *.txt > book_name.md
Why do I do this? Because Tesseract’s output is already separating new paragraphs with two line breaks, so the contents are already valid markdown, effectively. That means I can export from that .md file directly into a really clean HTML, the basis of all ebooks. In practice, though, I like to do a little more cleanup on the markdown first. Reinstate headings, for instance, and some global replaces for common errors and patterns.
With that done, instead of going straight out into HTML or EPUB, I instead use another open source library called Pandoc to produce a .docx – a Word file. Why am I making a .docx, rather than an ebook? I am notorious in the office for hating Word, but it’s important to remember that OCR is still not perfect. We need this text to be proofread and checked, particularly to reinstate any italics, since the base output from Tesseract is in plain text. And most proofreaders prefer to work with Word (although there are wonderful exceptions!).
If we were doing the proofreading in-house or I’m doing it myself, we’d do it in markdown. But since the transforms are so seamless with Pandoc, we can be a lot more flexible about formats from this point on (but maybe the details of that are for another article!).
From this point on, you can treat is as any other manuscript, really! Which it is, in a sense. One of the nice things about this process is that it was non-destructive – we still have the original book that we scanned, intact and available for us to check against in case of any doubts or errors in the OCR process.
I would encourage anyone in publishing to try it out – it’s sort of like the 21st century version of having your own letterpress. In general, that ‘get closer to the metal’ instinct I mentioned at the start is something that we don’t see enough of in the publishing industry. When was the last time publishers had typesetters in-house? These sorts of activities are so central to our industry, and we should at the very least dabble to get an understanding of how they work. The more you know…